 Business Label Maker
 Shipping Label Printer
 Tattoo Stencil Printer
 Mini Printer
 Home Label Printer
 New Arrivals
 Phomemo M221 Bluetooth Portable Thermal Business Label Maker
 Phomemo M200 Bluetooth Portable Thermal Business Label Maker

 Phomemo PM344-WF Shipping Label Printer 300DPI WiFi
 Phomemo PM64D Bluetooth Shipping Label Printer Upgraded Direct Touchscreen
 Phomemo M08F Wireless Tattoo Stencil Printer
 Phomemo M08F Plus Wireless Tattoo Stencil Printer with Touch Screen
 Phomemo T02 Inkless Mini Printer
 Phomemo M04S Mini Thermal Printer
 Phomemo P15 Vintage Ribbon Printer
 Phomemo D30 Portable Bluetooth Home Label Maker
 Phomemo Direct Thermal M08F Letter & A4 Portable Printer
 Phomemo Direct Thermal Portable Printer M832 Upgrade
 Phomemo Thermal Portable Printer M832D Upgraded Direct Touchscreen
 Phomemo TK20 Bluetooth Temporary Tattoo Printer with 40Pcs Temporary Tattoo Paper & 4 Markers
 Phomemo P3M AI Sticker Mini Printer
 Phomemo 40×30mm White Thermal Label for M110/M120/M150/M200/M220/M221-3 Roll
 Phomemo 50×80mm White Thermal Label For M110/M120/M200/M220/M221
 Phomemo More Sizes Label Sales for Business Label Maker
 Phomemo 4"x6" Fan-Fold Thermal Direct Labels for Shipping Label Printer
 Phomemo 2" Multiple Thermal Round Label for Shipping Label Printer
 Phomemo 2" Silver Thermal Holographic Sticker for Shipping Label Printer
 Phomemo Tattoo Transfer Paper For M08F/TP81/TP83/TP87 Tattoo Printer
 Phomemo Tattoo Transfer Paper For TP31 Tattoo Printer
 Phomemo Upgraded Tattoo Transfer Paper For M08F/TP81/TP83/TP87 Tattoo Printer
 Phomemo 53mm 20-year Lasting White Sticker Thermal Paper for M02/M02S/M02Pro/M03/M04S/M04AS/M832/P2S丨3 Rolls
 Phomemo 53mm White Sticker 10-Year-Lasting Thermal Paper for T02/M02X/M832丨3 Rolls
 Phomemo 110mm Paper for M04S/M04AS/M832 | 3 Rolls
 Phomemo 12mmx5m Pastel Blue&White&Red Ribbon Label Tapes for P15/A30
 Phomemo 12x40mm White Label for D30/D35/Q30/Q30S
 Phomemo 14x40mm Golden Thermal Label for D30/D35/Q30/Q30S
 Phomemo Quick Dry 8.26"x11.69" A4 Thermal Paper for M08F/M832/Q302
 Phomemo 2/4 Rolls Thermal Paper For M832 Portable Printer
 Phomemo Letter & A4 Paper for M08F/M832/Q302 | Free Storage Bag
 Phomemo PM64D Bluetooth Shipping Label Printer
 Phomemo M03C Flashcards Mini Printer
 Phomemo L85 Smart Touchscreen Professional Tattoo Stencil Printer
 Phomemo TA81 Continuous Tattoo Stencil Printer
Tattooing is a meticulous process where precision is key, as mistakes can be difficult to correct. To ensure accuracy, tattoo artists often prepare designs beforehand. There are two primary methods: freehand and using tattoo transfer paper. Freehand tattooing involves the artist directly drawing and inking on the client's skin without a stencil or pre-designed template. This technique demands a high level of skill and trust between the artist and client. However, the more common and practical approach, especially for beginners, is using tattoo transfer paper. This method allows artists to create a stencil, transferring the design onto the skin before tattooing, saving time and reducing the risk of errors.
Tattoo Transfer Paper: Understanding the Layers
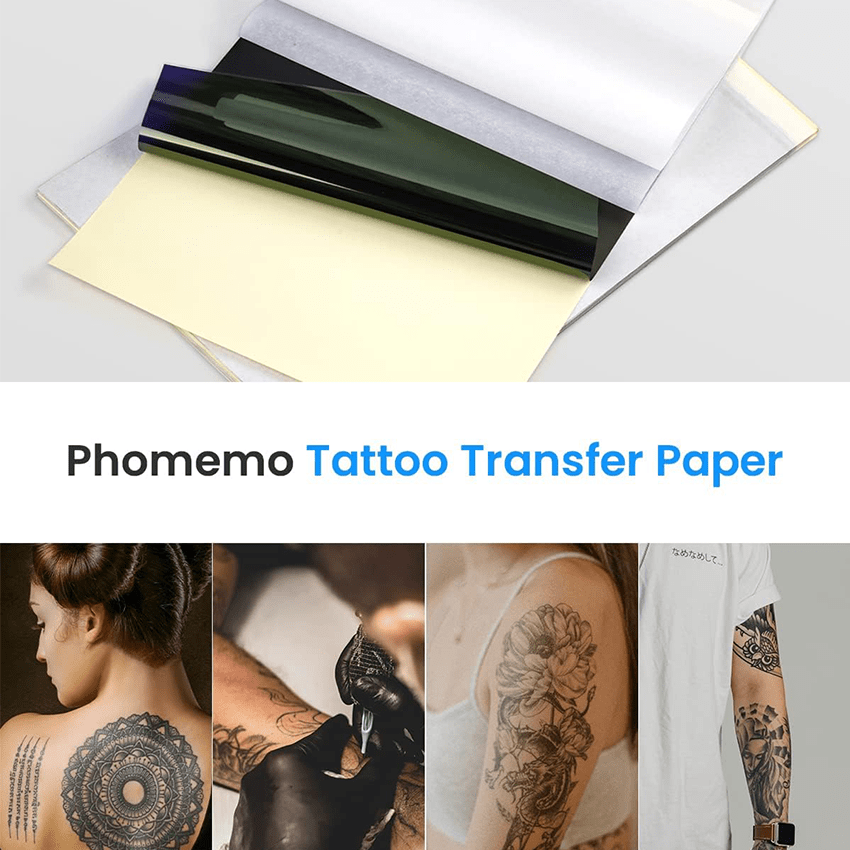
Tattoo transfer paper used with tattoo printers typically consists of four layers, each serving a distinct purpose:
Design Paper: This is the top layer where the design is drawn or printed. It’s the part that will be transferred onto the client’s skin.
Protective Paper: Acting as a barrier, this layer keeps the design paper clean and prevents smudging. It must be removed before use.
Purple Carbon Paper: The most crucial layer, responsible for transferring the design onto the skin. It contains the ink that makes the stencil visible.
Yellow Base Paper: A backing sheet that provides stability. It’s typically found in machine-printed transfer papers and serves as support during the printing process.

How to Use Tattoo Transfer Paper
Hand-Drawn Stencil Tutorial: Step-by-Step Guide

Step 1: Prepare the Tattoo Transfer Paper
Start by selecting a sheet of tattoo transfer paper. Remove the second layer, known as the protective paper, to expose the design paper.

Step 2: Draw the Design
Using a regular ballpoint pen or pencil, carefully draw your desired tattoo design directly onto the first layer (design paper). The pressure from the pen will transfer the ink onto the back of this layer.

Step 3: Check for Accuracy
Flip the paper over to ensure the entire design has been transferred clearly to the back. If any parts are missing or unclear, flip it back and complete the drawing.

Step 4: Cut and Prepare for Transfer
Once you're satisfied with the design, cut it out and prepare to transfer it onto the client’s skin for tattooing.
Creating a Tattoo Stencil with a Thermal Tattoo Printer
For tattoo artists who prefer digital designs, using a thermal tattoo printer can speed up the process and ensure greater accuracy. Here's how to create and transfer a tattoo stencil using a thermal printer:

Step 1: Create the Design Digitally
Use your preferred drawing software to design the tattoo. This allows you to easily make adjustments and preview the design with the client to ensure they are happy with it.

Step 2: Download and Connect
Once the design is finalized, download the image to your computer or smartphone. For mobile use, download the printer’s app and connect to the Phomemo M08F thermal tattoo printer via Bluetooth. For PCs, connect via a USB cable.

Step 3: Prepare the Tattoo Transfer Paper
Remove the protective paper (second layer) from the tattoo transfer paper. Print the design onto the printable layer using the thermal tattoo printer.

Step 4: Transfer the Design
Apply tattoo transfer cream to the client’s skin, then carefully place the stencil on the area. After the design has transferred, confirm with the client that the placement is correct. If they are not satisfied, you can easily remove the design with alcohol and reapply until it’s perfect.Tattoo Transfer Paper Recommendation
For high-quality results, we recommend Phomemo tattoo transfer paper, a popular choice among tattoo artists. Phomemo transfer paper is known for producing crisp, clear designs that transfer easily onto the skin. Its durable transfer ink ensures that the stencil remains intact throughout the tattooing process, resisting smudging and fading.
Each pack contains 100 sheets and is priced affordably at just $21.99. Plus, you can enjoy an additional 10% discount with the promo code TIPS8 when purchasing!
Tattoo Transfer Paper
- ☠︎︎8.27 x 11.69 inches
- ☠︎︎A pack of 100 sheets
- ☠︎︎Compatible with thermal tattoo printers
Conclusion
Using high-quality transfer paper like Phomemo ensures a precise and professional tattooing experience. Whether you’re hand-drawing or printing with a thermal tattoo printer, investing in reliable materials will significantly reduce errors and enhance your workflow.

