 Business Label Maker
 Shipping Label Printer
 Tattoo Stencil Printer
 Mini Printer
 Home Label Printer
 New Arrivals
 Phomemo M221 Bluetooth Portable Thermal Business Label Maker
 Phomemo M200 Bluetooth Portable Thermal Business Label Maker

 Phomemo PM344-WF Shipping Label Printer 300DPI WiFi
 Phomemo PM64D Bluetooth Shipping Label Printer Upgraded Direct Touchscreen
 Phomemo M08F Wireless Tattoo Stencil Printer
 Phomemo M08F Plus Wireless Tattoo Stencil Printer with Touch Screen
 Phomemo T02 Inkless Mini Printer
 Phomemo M04S Mini Thermal Printer
 Phomemo P15 Vintage Ribbon Printer
 Phomemo D30 Portable Bluetooth Home Label Maker
 Phomemo Direct Thermal M08F Letter & A4 Portable Printer
 Phomemo Direct Thermal Portable Printer M832 Upgrade
 Phomemo Thermal Portable Printer M832D Upgraded Direct Touchscreen
 Phomemo TK20 Bluetooth Temporary Tattoo Printer with 40Pcs Temporary Tattoo Paper & 4 Markers
 Phomemo P3M AI Sticker Mini Printer
 Phomemo 40×30mm White Thermal Label for M110/M120/M150/M200/M220/M221-3 Roll
 Phomemo 50×80mm White Thermal Label For M110/M120/M200/M220/M221
 Phomemo More Sizes Label Sales for Business Label Maker
 Phomemo 4"x6" Fan-Fold Thermal Direct Labels for Shipping Label Printer
 Phomemo 2" Multiple Thermal Round Label for Shipping Label Printer
 Phomemo 2" Silver Thermal Holographic Sticker for Shipping Label Printer
 Phomemo Tattoo Transfer Paper For M08F/TP81/TP83/TP87 Tattoo Printer
 Phomemo Tattoo Transfer Paper For TP31 Tattoo Printer
 Phomemo Upgraded Tattoo Transfer Paper For M08F/TP81/TP83/TP87 Tattoo Printer
 Phomemo 53mm 20-year Lasting White Sticker Thermal Paper for M02/M02S/M02Pro/M03/M04S/M04AS/M832/P2S丨3 Rolls
 Phomemo 53mm White Sticker 10-Year-Lasting Thermal Paper for T02/M02X/M832丨3 Rolls
 Phomemo 110mm Paper for M04S/M04AS/M832 | 3 Rolls
 Phomemo 12mmx5m Pastel Blue&White&Red Ribbon Label Tapes for P15/A30
 Phomemo 12x40mm White Label for D30/D35/Q30/Q30S
 Phomemo 14x40mm Golden Thermal Label for D30/D35/Q30/Q30S
 Phomemo Quick Dry 8.26"x11.69" A4 Thermal Paper for M08F/M832/Q302
 Phomemo 2/4 Rolls Thermal Paper For M832 Portable Printer
 Phomemo Letter & A4 Paper for M08F/M832/Q302 | Free Storage Bag
 Phomemo PM64D Bluetooth Shipping Label Printer
 Phomemo M03C Flashcards Mini Printer
 Phomemo L85 Smart Touchscreen Professional Tattoo Stencil Printer
 Phomemo TA81 Continuous Tattoo Stencil Printer


 M110
M110
 M120
M120
 M200
M200
 M220
M220
 M04S
M04S
 M08F
M08F
 PM-246S
 PM-246
 PM-201
 PM-246 Pro
 M02
M02
 M02 PRO
 M02S
M02S
 P12
P12
 D30
D30
 Q30S
Q30S
 Q30
Q30
 Q31
Q31
 Q32
Q32
Quickly Start Guide
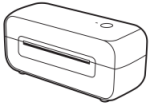
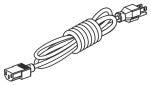
![]() Package contents
Package contents
![]()
![]()

![]()
Printer USB Cabel Power Adapter Power Cord Quickly Start Guide U disk
|
Note: U disk for diver installation, How-To-Videos, Printer Getting Started, Troubleshooting, How-Tos (which including Label Adjustments, Tips & Tricks and Platform Setup) |
![]() Machine components
Machine components
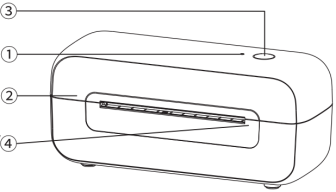
② Cover
③ Feed Button
④ Label Feed Path and Tear Bar
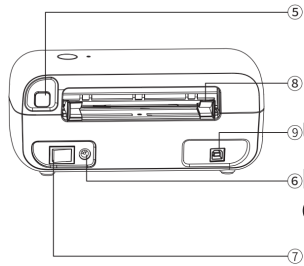
⑤ Cover Release Button
⑥ DC Adapter Connector
⑦ Power Switch
⑧ Paper Guide
⑨ USB Port
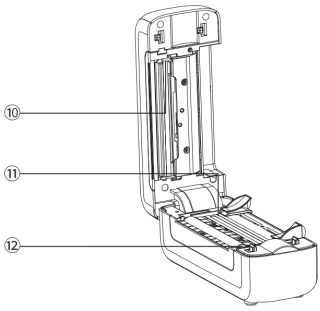
⑩ Thermal Printhead
⑪ Paper Guide
⑫ Platen Roller
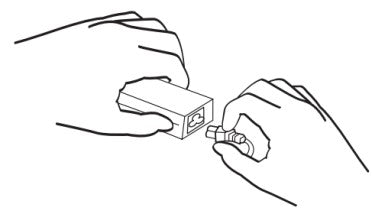
![]() Quick Start
Quick Start
1.Connect the power source safely
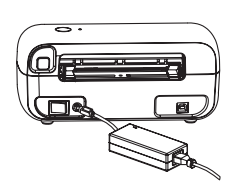
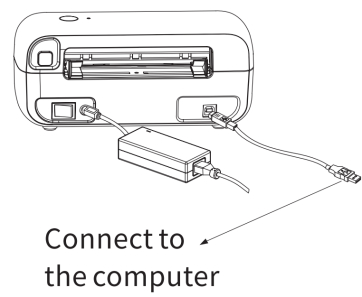
② Next insert the adapter cable to the machine and ensure the printer is OFF; (I:On; O:Off)
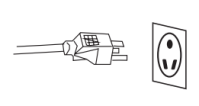
③ Finally connect the cord to the power source.
2. Connect the USB cable.
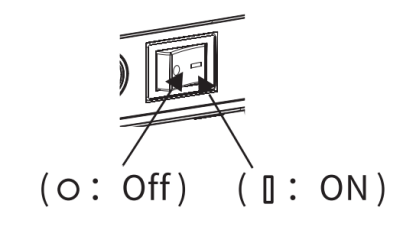
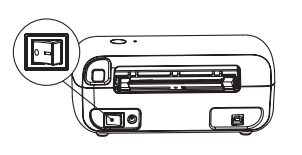
(I:On; O:Off)
Use the power switch to turn on the printer.
WARNINGDo not disconnect from the power line, when the printer is on. This may easily damage the printer and data will be lost. |
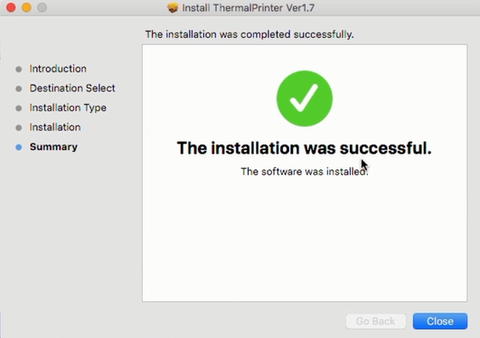
![]() Install the driver & Set as default printer
Install the driver & Set as default printer
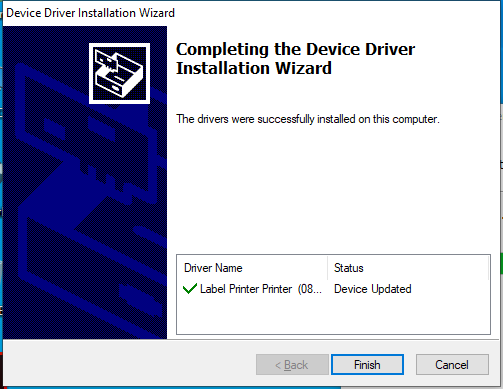
Before installation, please ensure printer is connected and turned on.
Download the driver from the website www.phomemo.com and follow the prompts. (See the picture below) |
Windows Mac
1. For Win
① Go to “Devices and Printers” -> Right Click on “Label Printer” -> choose “Printer Preferences” (See the picture a).
② Go to “page setup”. Choose correctly paper size from “Paper Name” for your label (See the picture b).
③ If the size you need is not listed, then click “New” (See the picture c), input the size of “Paper Width”, “Paper Length” and “Paper Name”, then click “OK” to archive (See the picture d).

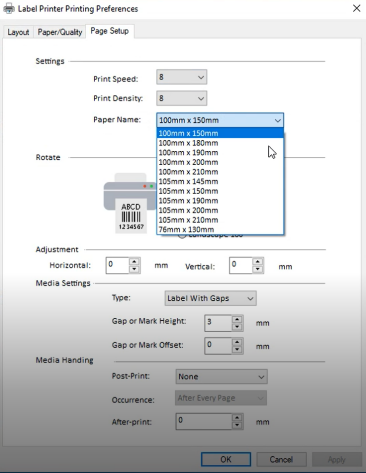
(a) (b)
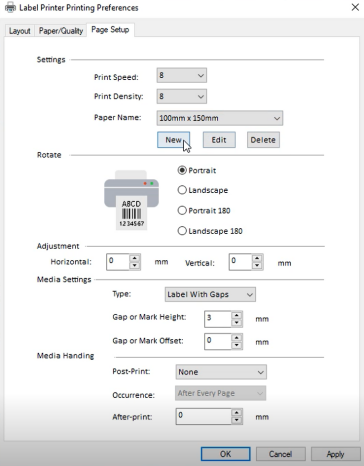
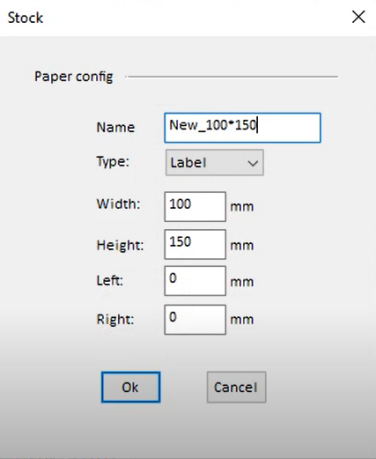
(c) (d)
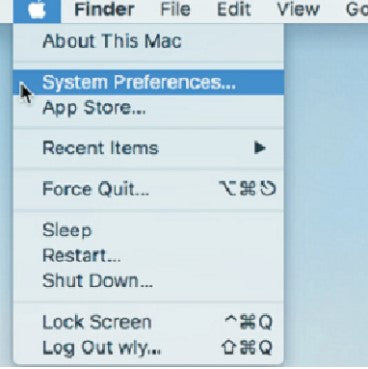
2. For Mac
① Click “ ” and go to “System Preferences” (See the picture e).
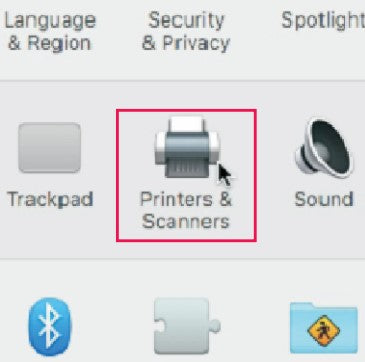
② Select “Printer & Scanners” (See the picture f).
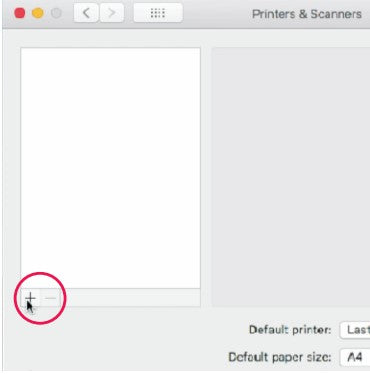
③ Click “+” to set up a printer (See the picture g).
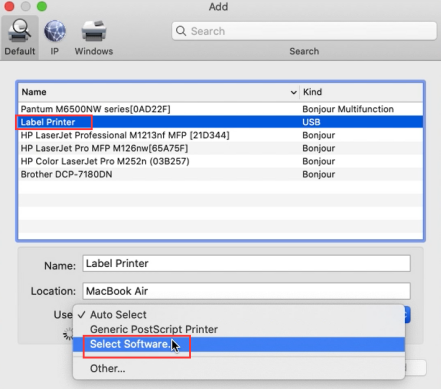
④ Select “Label Printer” and click “Select Software” (See the picture h).
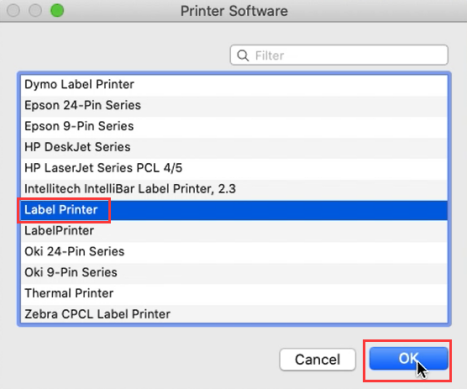
⑤ Select “Label Printer” and click “OK” (See the picture i).
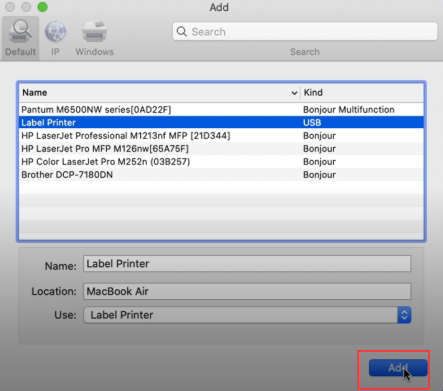
⑥ At last click “Add” (See the picture j).
(e) (f)
(g) (h)
(i) (j)
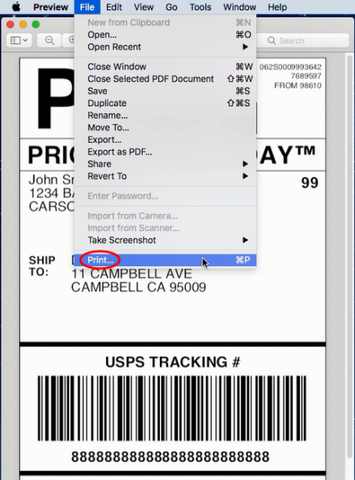
⑥ When printing your file (e.g. a PDF). Please choose correctly paper size from “Paper Size” for your label (See the picture k).
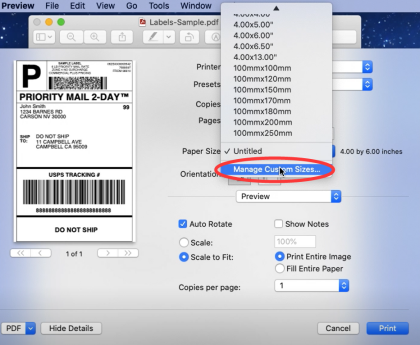
⑦ If the size you need is not listed, then click “Manage Custom Sizes” (See the picture l), input width and height, then click “OK” (See the picture m).
(k) (l)
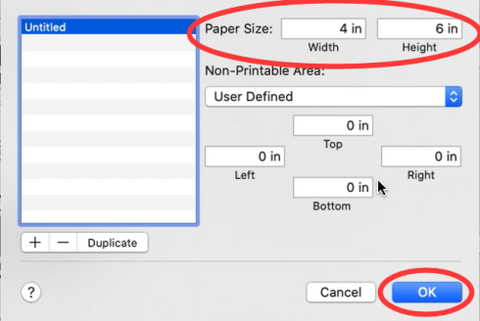
(m)
![]() Label Setup
Label Setup
1.Load your label
① Turn the printer on;
② Adjust paper guide (See the picture n);
③ Insert label and ensure it is straightly and smoothly (See the picture o);
④ Make sure the label is automatically caught by the printer (See the picture p).
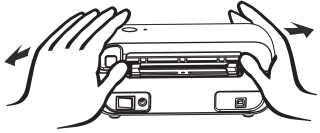
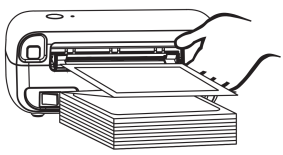
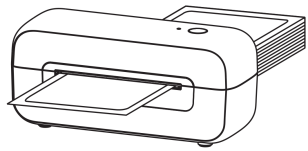
(n) (o) (p)
ATTENTION: Print side should be facing up. |
2.Run the automatic identification of the label size
① Press and hold the Feed Button for 5 sec. After the blue light flashes 2 times, then release the Feed Button. The printer will move the label back and forth to determine the gap size and other properties of your label.
② When you see the label positioned at the tear off point, printing can begin.
|
NOTE: Anytime you change your label, run the automatic identification of label size. |
![]() Feed Button Mode
Feed Button Mode
| Desired Action | Execution |
| Skip a label | Press the Feed Button while printer is standby (i.e. nothing is being printed). |
| Restore factory setting | While printer is standby, press and hold the Feed Button for 10 sec.After the blue light flashes 4 times, then release the Feed Button. |
| Automatic identificationof the label size(Execution for labels that are separated by black lines or marks) | While printer is standby, press and hold the Feed Button for 7 sec.After the blue light flashes 3 times, then release the Feed Button.※Anytime you change your label, run the automatic identification of the label size. |
| Automatic identificationof the label size(Execution for labels that are separated by gaps) | While printer is standby, press and hold the Feed Button for 5 sec.After the blue light flashes 2 times, then release the Feed Button.※Anytime you change your label, run the automatic identification of the label size. |
| Print out test page | While printer is standby, press and hold the Feed Button for 2 sec.After the blue light flashes 1 times, then release the Feed Button. |
| Pause printing | Press the Feed Button while printing. |
| Resume printing | When printing is paused, press the Feed Button to resume printing. |
| Clear printing data | When printing is paused, double-click the Feed Button to clear the printing data. |
![]() Buzzzer Status
Buzzzer Status
|
LED Status and Color |
Printer status |
Troubleshooting |
|
Solid Blue |
Standby |
---- |
|
Flashing Blue slowly |
Label jams or label detection error |
Turn off printer. Open the Cover and use the alcohol pads to wipe the Printhead, Platen Roller and Detection Sensor clean. (Any 70% Alcohol pad would work.) Allow 2-3 minutes for components to dry, then close the Cover and turn Label Printer back on. |
|
Flashing Blue quickly |
Wrong media tracking |
Change the way of automatic identification of the label size.
(1) For labels that are separated by black lines or marks: While printer is standby, press and hold the Feed Button for 7 sec. After the blue light flashes 3 times, then release the Feed Button. (2) For labels that are separated by gaps: While printer is standby, press and hold the Feed Button for 5 sec. After the blue light flashes 2 times, then release the Feed Button.
※Anytime you change your label, run the automatic identification of the label size. |
|
Solid Red |
The Printhead is over temperature. |
Printing will stop until the Printhead cools to an acceptable printing temperature. When it does, the printer will automatically resume operation. |
|
Flashing Red slowly |
Labels are empty or not loaded properly |
Check the label status or replace new labels |
|
Flashing Red quickly |
The Cover has NOT been completely closed |
Firmly press the Cover to confirm that it has been completely closed. |
|
Solid Purple |
Printing |
---- |
|
Flashing Purple quickly |
Pause printing |
---- |
Note: It is not necessary to turn off the printer for these errors. After trouble shooting it should continue to work.
![]() Troubleshooting
Troubleshooting
| Issue | Problem | Reason | Solution |
| Print Quality Issues | My print is poor quality? | (5)Cover is not completely closed | Firmly press the Cover to confirm that it has been completely closed |
| (1)Poor quality of label paper | The darkness of the label depends on the label manufacturer. High quality labels produce darker prints. | ||
| (2)Margins and paper size | Please make sure the label size is correct before printing. If the content exceeds the label size, the printer may "shrink" the size to a smaller size resulting in faded content. NOTE: If you are printing 4 x 6 inches labels, the sample 4 x 6 inches label from Phomemo website should take up the full width and height of your label. |
||
| (3)Print density and speed | Follow FAQ's steps from Phomemo website to adjust print density and speed on computer. NOTE: Setting the density too high may cause some unwanted dark lines and/or the label getting too hot and sticking to the Printhead. | ||
| (4)Dust or adhesive on the printhead | Turn off printer. Open the Cover and use the alcohol pads to wipe the Printhead and Platen Roller clean. (Any 70% Alcohol pad would work.) Allow 2-3 minutes for components to dry, then close the Cover and turn Label Printer back on. NOTE: Firmly press the Cover to confirm that it has been completely closed. | ||
| Why are there white spots on label? | Dust or adhesive on the printhead | Turn off printer. Open the Cover and use the alcohol pads to wipe the Printhead and Platen Roller clean. (Any 70% Alcohol pad would work.) Allow 2-3 minutes for components to dry, then close the Cover and turn Label Printer back on. NOTE: Firmly press the Cover to confirm that it has been completely closed. | |
| Label Issues | Printing blank labels | Your labels are loaded in upside down | Please ensure your labels are properly loaded. The print side should be facing up. |
| Ensure your labels are "Direct Thermal" labels | |||
| Try to print out test page | Turn off the printer. Press the Feed Button and hold it until you turn on the printer, release. Printer will print a test page. If test print looks good, please try to print your label again. | ||
| Skipping labels or continuously feeding | (1)Change your label type and size are the main causes for printer skipping labels or continuously feeding | Disconnect the USB from your printer. Let your printer re-learn your label: Press and hold the Feed Button for 5 sec. After the blue light flashes 2 times, then release the Feed Button. Printer will move the label back and forth to learn the gap size and other properties of your label. Then change your label type, size on your computer, then re-connect the USB to the printer. | |
| (2)The sensor which detects the paper, is covered by dust and that cause the detection is incorrect | Turn off printer. Open the Cover and use the alcohol pads to clean the sensor. (Any 70% Alcohol pad would work.) Allow 2-3 minutes for components to dry, then close the Cover and turn Label Printer back on. | ||
| I get horizontal label instead of vertical label |
-- | For Mac Open a desired file and printing->click "Show Details"-> select printing direction in "Orientation" For Windows Open "Devices and Printers"-> right click on "Label Printer"-> choose "Printer Preferences" -> go to "Page Setup" select "Landscape" under "Rotate" |
|
| Barcode is not printing clearly | (1)The source file wasn't created in the ideal quality | Print the sample label to test if your printer is working well. | |
| (2)High print speed or density | Try reducing your print speed (try 3 in/sec) and your print density (try 3 as well) to see if you obtain a better result. | ||
| Paper jams or label prints only half and stops |
High print density | High print density causes the label to get too hot and get stuck to the Printhead. Different labels require different heating temperatures. Set your print speed to "4 in/sec" and density to "2" and try print again. If the label is too light, increase the density by 1. | |
| Same label keeps printing | When printer doesn't believe a label was printed correctly, it will attempt to re-print it | Turn power switch off . This clears any pending print jobs. Let your printer re-learn your label: Press and hold the Feed Button for 5 sec. After the blue light flashes 2 times, then release the Feed Button. Printer will move the label back and forth to learn the gap size and other properties of your label. | |
| Other Issues | Nothing happens when I try to print | Printer is connected to a new USB Port | Open your "Control Panel" -> "Printers and Devices" and note which Label Printer is "active". It may be Label Printer, Label Printer (Copy 1), Label Printer (Copy 2), etc. Then be sure to print to the same active printer name when printing. |
| Printer doesn’t turn on | Ensure power connection | A. Ensure the wall plug has electricity by plugging another device into that same plug. B. Follow the power cable to the adapter and check that the cable that goes to printer is plugged in all the way into the power adapter. C. Ensure the plug that goes into printer is fully inserted. D. Turn the power switch off and on (I: On; O: Off). This switch is located on the back side of printer. |
|
| Printer makes loud noise when printing | Print speed being set too low or density set too high | Set your print speed to "5 in/sec" and density to "4" and print. If the label is too light, increase the density by 1. | |
| Why are the label sizes in millimeters? | Windows is designed to use the metric system | To convert inches to millimeters on Google. |
![]() Maintenance
Maintenance
① Turn the printer off, remove the power cord, and open the cover.
② Wait until the Printhead cools down. The Printhead may be very hot after printing.
③ Completely clean Printhead using an alcohol swap (NOT WATER).
④ Wait until the alcohol has completely vaporized, then close the cover.
⑤ Connect the power cord and print a test page to check if it is clean.
NOTICE: Ensure power is off when performing maintenance.
![]() PRO Tips
PRO Tips
> To print a test page, press and hold the Feed Button for 2 sec, while printer is standby. After the blue light flashes 1 times, then release the Feed Button.
> Avoid using poor quality labels as they can damage the printer.
> Regularly clean the Printhead.
> Insert Printer into the same USB port on your computer every time. This will avoid creating duplicate copies of the printer in your operating system.
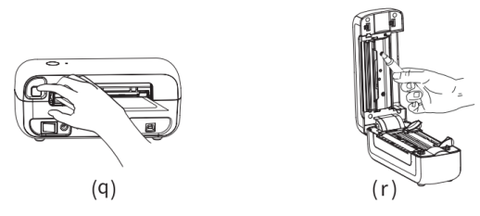
> If paper is jammed, turn the printer off and allow the printhead to cool down. Open the Cover (See the picture q). Check for any residue on the Printhead and Platen roller. (Any 70% alcohol pad would work. See the picture r) Then close the Cover securely, after it is dry. Firmly press the Cover to confirm that it has been completely closed, then you can print.
![]() Safety Notices
Safety Notices
> Do not bend the power cord excessively or place objects on the cord.
> Do not use the printer if you find any irregularities as these could result in fire or electrocution.
> Keep the printer out of reach of children.
> Use only approved accessories and do not try to disassemble or repair the unit by yourself.
> Keep the printer away from water and other objects that could penetrate the components.
> Unplug the printer when it is not in use for long periods.
![]() Support
Support
Your Phomemo is covered by a one-year warranty.
In the unlikely event that you experience any issues with your printer, please contact Phomemo priority customer service to promptly receive troubleshooting tips for a replacement.
Contact information:
For any questions and/or suggestions, please call the Phomemo team +1 855 957 5321, or email at support@phomemo.com, or visit www.phomemo.com and click on "Support".
Whatsapp 1: +86 13928088284 Whatsapp 2: +86 15338193665
Skype 1: Phomemo Team-Jessie Skype 2: Phomemo Team-Helen
For how-to videos, parts and full warranty details, please visit www.phomemo.com

