 Business Label Maker
 Shipping Label Printer
 Tattoo Stencil Printer
 Mini Printer
 Home Label Printer
 New Arrivals
 Phomemo M221 Bluetooth Portable Thermal Business Label Maker
 Phomemo M200 Bluetooth Portable Thermal Business Label Maker

 Phomemo PM344-WF Shipping Label Printer 300DPI WiFi
 Phomemo PM64D Bluetooth Shipping Label Printer Upgraded Direct Touchscreen
 Phomemo M08F Wireless Tattoo Stencil Printer
 Phomemo M08F Plus Wireless Tattoo Stencil Printer with Touch Screen
 Phomemo T02 Inkless Mini Printer
 Phomemo M04S Mini Thermal Printer
 Phomemo P15 Vintage Ribbon Printer
 Phomemo D30 Portable Bluetooth Home Label Maker
 Phomemo Direct Thermal M08F Letter & A4 Portable Printer
 Phomemo Direct Thermal Portable Printer M832 Upgrade
 Phomemo Thermal Portable Printer M832D Upgraded Direct Touchscreen
 Phomemo TK20 Bluetooth Temporary Tattoo Printer with 40Pcs Temporary Tattoo Paper & 4 Markers
 Phomemo P3M AI Sticker Mini Printer
 Phomemo 40×30mm White Thermal Label for M110/M120/M150/M200/M220/M221-3 Roll
 Phomemo 50×80mm White Thermal Label For M110/M120/M200/M220/M221
 Phomemo More Sizes Label Sales for Business Label Maker
 Phomemo 4"x6" Fan-Fold Thermal Direct Labels for Shipping Label Printer
 Phomemo 2" Multiple Thermal Round Label for Shipping Label Printer
 Phomemo 2" Silver Thermal Holographic Sticker for Shipping Label Printer
 Phomemo Tattoo Transfer Paper For M08F/TP81/TP83/TP87 Tattoo Printer
 Phomemo Tattoo Transfer Paper For TP31 Tattoo Printer
 Phomemo Upgraded Tattoo Transfer Paper For M08F/TP81/TP83/TP87 Tattoo Printer
 Phomemo 53mm 20-year Lasting White Sticker Thermal Paper for M02/M02S/M02Pro/M03/M04S/M04AS/M832/P2S丨3 Rolls
 Phomemo 53mm White Sticker 10-Year-Lasting Thermal Paper for T02/M02X/M832丨3 Rolls
 Phomemo 110mm Paper for M04S/M04AS/M832 | 3 Rolls
 Phomemo 12mmx5m Pastel Blue&White&Red Ribbon Label Tapes for P15/A30
 Phomemo 12x40mm White Label for D30/D35/Q30/Q30S
 Phomemo 14x40mm Golden Thermal Label for D30/D35/Q30/Q30S
 Phomemo Quick Dry 8.26"x11.69" A4 Thermal Paper for M08F/M832/Q302
 Phomemo 2/4 Rolls Thermal Paper For M832 Portable Printer
 Phomemo Letter & A4 Paper for M08F/M832/Q302 | Free Storage Bag
 Phomemo PM64D Bluetooth Shipping Label Printer
 Phomemo M03C Flashcards Mini Printer
 Phomemo L85 Smart Touchscreen Professional Tattoo Stencil Printer
 Phomemo TA81 Continuous Tattoo Stencil Printer


 M110
M110
 M120
M120
 M200
M200
 M220
M220
 M04S
M04S
 M08F
M08F
 PM-246S
 PM-246
 PM-201
 PM-246 Pro
 M02
M02
 M02 PRO
 M02S
M02S
 P12
P12
 D30
D30
 Q30S
Q30S
 Q30
Q30
 Q31
Q31
 Q32
Q32
Quick Start Guide

CONTENT
Quick Start Video------------------------------------- 1
Product Overview-------------------------------------2
Step 1: Get your printer started-------------------3
Step 2: Label Loading --------------------------------5
Step 3: Download the Driver-----------------------7
Step 4: Driver Installation---------------------------8
For macOS
Step 4-1: macOS: Security & Privacy Setting---- 9
Step 4-2: macOS: Driver Installation------------ 12
Step 4-3: macOS: Printer Setup------------------15
For Windows
Step 4-1: Windows: Driver Installation--------- 19
Step 4-2: Windows: Printer Setup-------------- 21
Introduction of Feed Button---------------------- 25
Introduction of Status Light----------------------- 26
Maintenance------------------------------------------ 27
PRO Tips------------------------------------------------ 28
Safety Notices----------------------------------------- 28
Quick Start Video

Important Tip:Please watch the short setup video for a fast and easy setup.
Visit https://phomemo.com/pages/pm-246-pro-setup-guide
The Phomemo printer is a very capable printer. You can print barcodes, shipping labels, name badges, warehouse labels, food nutrition labels, amazon FBA labels and labels of all sizes with it. It prints without the need of ink or cartridges. It’s the perfect partner for your business with its economical, reliable and high-efficient features.
Please take a short time to watch the setup video. It will guide you to setup the printer step by step.
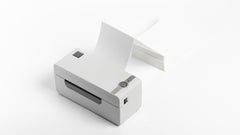
Product Overview
Package contents
Printer*1, Power Cord*1, Power Adapter*1, USB Cable*1, USB Driver*1, Quick Start Guide*1, Start Label*1, TC Adapter*1
Printer components


> Please take a moment to thoroughly read this user guide.
Incorrect operation may result in damage to the printer or your physical injury.
|
|
1.Ensure that the printer is OFF. The power switch is switched to O. (I:On; O:Off) |
|
|
2.Attach the power cord to the adapter. |
|
|
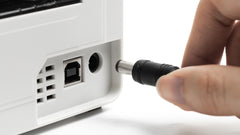
3.Plug the adapter cable into Circular DC adapter connector of the printer. |
|
|
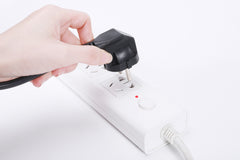
4.Plug the power cord into the socket. |
|
|
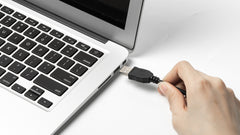
5.Connect the USB cable to the printer. |
|
|
6.Connect the other end of the USB cable to the computer. |
|
|
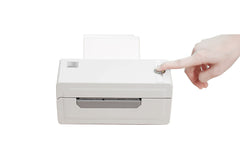
7.Turn the printer ON with the power switch (I:On; O:Off) |


STEP 2 Label Loading
The Phomemo printer is capable of working with labels ranging from 1.89" to 4.33" (48 to 110mm) in width. To print on different labels correctly, the printer needs to identify your label size before it starts printing.
> To run the automatic label identification,
please follow these steps:
|
|
1.Turnontheprinter. (I:On;O:Off) |
|
|
2.Adjust the paper guide to match the label size. |
|
|
3.Insert label, ensure it is straight and smooth as shown. Note: The print side should face up |
|
|
.4.Make sure the label is automatically caught by the printer |
|
|
5.Press and hold Feed Button until you hear one Beep, then release the Feed Button. |
|
|
6.The printer will move the label back and forth to learn the gap size. |


NOTE: Please run the label size identification every time you change your label. (See picture 5 & 6)
STEP 3 Download the Driver
> Continue to Driver Installation
Method 1:
Download the latest printer driver from the USB driver attached.


Method 2:
Download the latest driver from
www.phomemo.com -> Shipping Label Printer -> PM-246 Pro Printer Driver


STEP 4 Driver Installation
> Please run the downloaded software from the website or USB driver indicated above and follow the hints to complete the installation.

(Mac Driver Installer) (Win Driver Installer)
Note: Before the installation, please ensure the printer is connected and turned on!
▶If the installation is not successful, please contact us.
TEL: +1 855 957 5321 (US ONLY)
Service time: Mon-Fri 9AM-5PM (US EST)
Email:support@phomemo.com
Whatsapp: +86 13928088284 / +86 15338193665
Skype : Phomemo Team-Jessie / Phomemo Team-Helen
Contact us on-live chat or WhatsApp, Scan QR code:

For more videos, please visit: www.youtube.com
●Search for "Phomemo" and go to the home page
●Search for you purchased printer model (i.e PM-246 Pro)
●You will find the tutorial videos for an easy setup
STEP 4.1 Security & Privacy Setting for macOS
(1) Double click the "pkg" installer to begin.
(2) If the driver can not be opened, please give permission to it first. Click "OK" and follow the steps below to allow the macOS system to process the installation.

(3) Click the upper left corner and go to "System Preferences".

(4) Select "Security&Privacy".

(5) Under "General", click "Open Anyway" to set up.

(6) Input the password of your Mac. Then click "Modify Settings".
Note: If you didn’t need to set a password, please skip this step.

(7) Click "Open" and continue to install the driver.


STEP 4.2 Driver Installation for macOS
(1) Follow the installation steps until you receive the
"Installation was successful" message.

(2) Click the upper left corner and go to "System Preferences".

(3) Select "Printer & Scanners"

(4) Click "+" to add a printer

(5) Select "Thermal Label Printer"-> Click "Select Software" under "Use"

(6) Select "LabelPrinter Label Printer" and click "OK"

(7) Click "Add"

STEP 4.3 Printer Setup for macOS
(1) Print a sample label: Open the desired file (e.g. a PDF with Preview).

(2) Click "File" and choose "Print".

(3) Select "Show Details".

(4) Choose a paper size from "Paper Size".
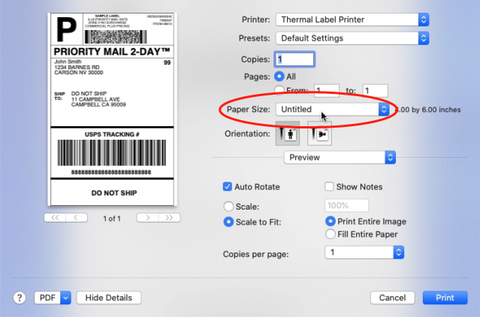
①If there is no suitable label size for you, please click "Manage Custom Sizes" to add the size.
②Input width and height, then click "OK".


(5) Select "Printer Features" in "Preview", you can set up the printer properties such as "Media Tracking", "Darkness" and "Print speed".


① Select paper type in "Media Tracking". Choose from "Continuous", "Gap" or "Black Line".

② You can change the Printing Speed and the Darkness of your printing (Larger number means higher Darkness)


(6) After setup, click "Print"

STEP 4.1 Driver Installation for Windows
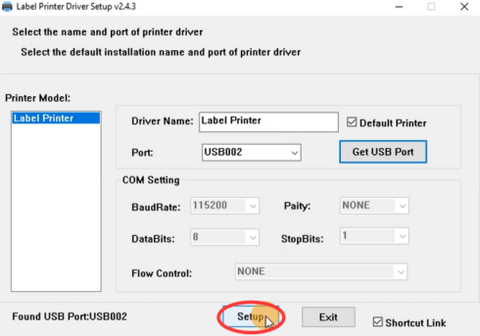
(1) Double click the installer to begin. Follow the prompts to complete the installation.
①Click "Get USB Port" to check which USB Port the label printer is connected with.


②Click "Setup" to setup the USB Port.

(2)To check the if printer is connected successfully:
①Right click on "This PC", choose "Properties",
then click on "Control panel"-> "Devices and Printers"


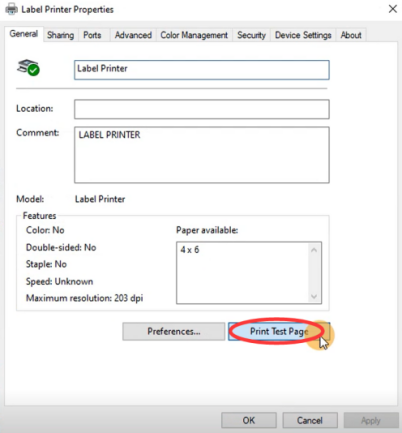
②Right click on "Label Printer" -> "Printer Properties"
-> Click on "Print Test Page"

STEP 4.2 Win: Printer setup
(1) Set as default printer
Right click on "Label Printer" -> "Set as default printer"

(2) Select the paper type
①Right click on "Label Printer" -> choose "Printer Preferences"

②Go to the "Page Setup".
You can choose the size you need in "Paper Name"

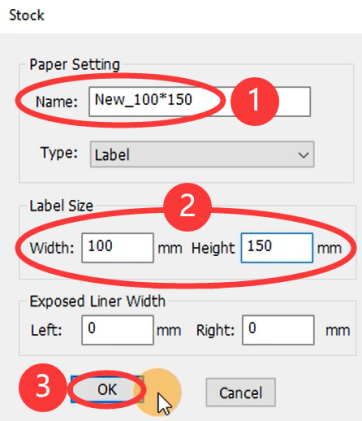
③If there is no suitable label size for you, please click "New" to create the needed size.

④Change Paper name and input width and height, click "OK"
(3) Set up Print speed and Darkness
You can change the printing speed and the Darkness of your printer (Larger number means higher Darkness) and click "OK".

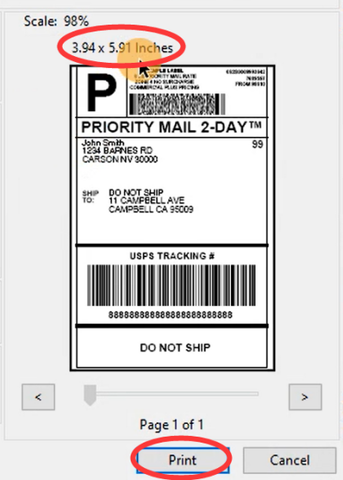
(4) Print a sample label: Open a desired file (e.g. a PDF).
①Click "Pint"

②Select the printer "Label Printer"

③Preview and check the print size, then click "Print".
LED STATUS

|
Light |
Printer status |
|
Solid Green |
Standby and Ready |
|
Red and green flashing alternately |
Printer head is over-heated |
|
Flashing Red slowly (once every 2 seconds) |
Paper shortage |
|
Flashing Red quickly (twice per second) |
Cover is not closed |
FEED BUTTON
|
Desired Action |
Execution |
|
How to skip a label |
Insert label and ensure it is straight and smooth. When the printer is standby and ready to print, simply press the Feed Button once (i.e. nothing is being printed). |
|
How to restore factory setting |
When the printer is standby and ready, press and hold the Feed Button until you hear "Beep Beep Beep", then release the Feed Button. Turn the power off and then turn on. Insert label and ensure it is straight and smooth. Run the automatic label identification to restore. |
|
How to run the automatic label identification (gap label) |
Insert label, ensure it is straight and smooth. When the printer is standby and ready, press and hold the Feed Button until you hear one Beep, then release the Feed Button. |
|
How to print out test page |
Insert label, ensure it is straight and smooth. When the printer is standby and ready, press and hold the Feed Button until you hear "Beep Beep", then release the Feed Button. |
Maintenance
▶Printer head Cleaning Steps
1.Turn the printer off, remove the power cord and open the cover by pushing the release latches forward. (See picture 1)
2.Wait until the Printer head cools down. (The printer head may be very hot after printing)
3.Completely clean Printer head using an alcohol swap (NOT WATER). (See picture 2)
4.Wait until the alcohol has completely vaporized, then close the cover.
5.Connect the power cord and print a test page to check if it is clean.

NOTICE
Ensure power is off when performing maintenance.
Do not touch or scratch the printer head surface, roller or sensors.
PRO Tips
1.Avoid using poor quality labels as they can damage the printer
2.Regularly clean the printer head.
3.Insert Printer to the same USB port on your computer every time. This will avoid creating duplicate copies of the printer in your operating system.
4.If paper is jammed, see "Printer head Cleaning Steps" from "Maintenance".
Safety Notices
1.Do not bend the power cord excessively or place objects on the cord.
2.Keep the printer out of reach of children.
3.Use only approved accessories and do not try to disassemble or repair the unit by yourself.
4.Keep the printer away from water and other objects that could penetrate the components.
5.Unplug the printer when it is not in use for long periods.
6.Do not use the printer if you find any irregularities as these could result in fire or electrocution.
7.Do not touch the printer head. The printer head can become very hot after printing labels.
Phomemo is a registered trademark of Quin Technology Co.,Ltd
2020 Quin Technology Co.,Ltd.All Rights Reserved.

